
momius - Fotolia
An overview of VMware snapshots and how to manage them
In a VMware environment, you can use a snapshot to save a short-term image of a VM prior to patches or upgrades. However, too many snapshots can cause performance issues.

A VMware snapshot takes a copy of a VM's disk file. They provide a change log for a virtual disk, and you can use them to restore a VM to a specific state at a specific point in time, which is particularly useful after a failure or system error.
You can use VMware snapshots as temporary backups during upgrades and patches. So, when problems arise, you can easily revert a VM to its snapshot state, and even automate snapshot management -- creation, reversion and removal -- using PowerCLI.
Snapshots alone do not provide adequate backup capabilities in the long term, however. You have to also ensure you manage the snapshots of your VM disk files carefully, as they can eat up significant storage resources.
What are VMware snapshots?
A VMware snapshot is essentially a short-term image of a VM that preserves the power state and data files -- such as disks, memory and virtual network interface cards -- of that VM at a specific time. You can create or delete snapshots, and decide who else has the ability to do so, via the vSphere management client, the ESX service console or the vSphere command-line interface (CLI). By default, the owner of a VM can create a snapshot of that VM, but usually only a system admin can delete snapshots.
VMware supports a maximum number of 32 snapshots in a chain but doesn't recommend having much more than two or three or keeping them for longer than 72 hours, because snapshots can eat up storage resources and snapshot files only grow over time.
How to use snapshots
Snapshots protect in the event of an error or failure so you can easily revert to the prior state of a VM.
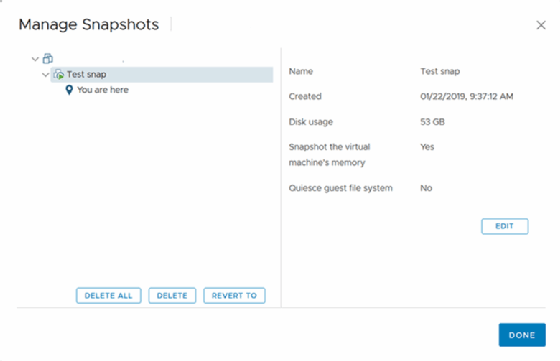
You can manage your snapshots via the vSphere Client by connecting to either an ESX server or vCenter Server. When you revert back to a snapshot, the system discards the current disk and memory states, and the VM to which the snapshot corresponds reverts to the state at which the snapshot was taken. This becomes the parent snapshot.
When you choose Revert to Snapshot via the vSphere Client or Snapshot Manager, it simply reverts to the most recent snapshot you took. If you want to revert to an older snapshot, use Snapshot Manager and select Go To to select the specific snapshot you want to revert to.
Snapshots vs. backups
Although both preserve the state of a VM, snapshots and backups are not equal. You should avoid using snapshots as backups for a few reasons.
Snapshots work well for making short-term copies of VMs, but the longer you keep them, the more disk space they take up on your data stores. Once you run out of data store space, VMs begin to shut down and stop working. Merging snapshot data back to an original disk also negatively affects VM performance, and VMware's Fault Tolerance feature doesn't support snapshots.
For long-term protection and better disaster recovery preparation, use backups instead of snapshots. Snapshots work best in the short term during upgrade or patch processes.
Automate snapshot management
You can automate snapshot management with PowerCLI. Use three cmdlets to create, revert to and delete snapshots.
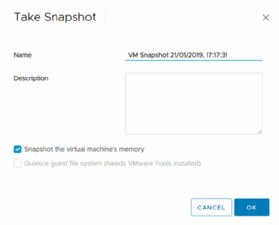
Use the cmdlet New-Snapshot to create a new snapshot. Fill out the Name and Description fields to define what you want to name the snapshot as well as its function. Apply the -VM parameter to denote which VM you want to take the snapshot of. You can also apply the Where-Object cmdlet and use the Guest property to filter for specific VMs.
To delete snapshots with PowerCLI, use the Remove-Snapshot cmdlet. You can apply the -RemoveChildren parameter as well to ensure that the children of the snapshot are also removed.
To use PowerCLI to revert to a snapshot, use one of two cmdlets: Set-VM with the -Snapshot parameter, or Get-Snapshot. However, don't often use PowerCLI to revert to a snapshot outside of testing purposes.
Drawbacks to using snapshots
Holding onto too many snapshots or holding onto snapshots for too long can cause performance issues in your environment. These include low VM performance, corrupted VMs, and loss of data store space and requirements for disk consolidation.
To avoid issues, closely monitor your vSphere environment. To check whether you have any VMs with snapshots currently running, connect your vCenter Server to your vSphere Web Client and navigate to the Virtual Machines tab. Right-click the column title and click Show/Hide Columns, then click the Needs Consolidation column to find a list of VMs with snapshots. You can either consolidate these snapshots or remove them.
You can also use the Windows application RVTools to gather information about your VMs and ESXi hosts and track which VMs have snapshots.