Victoria - Fotolia
How to connect VMware Workstation virtual machines to the Internet
Learn how to configure VMware Workstation virtual networks, including connecting guest virtual machines to the Internet, use the Virtual Network Editor and more.

VMware Workstation offers many possibilities for how to connect to the internet in VMware and configure virtual networking -- you can bridge VMs to the Internet, connect VMs to the Internet via NAT, create private connections or use a host-only virtual network. Each method has its own particular use, which depends largely on your security configuration.
VMware Workstation makes the ideal desktop application for a self-contained lab testing environment on your desktop or laptop. With Workstation, you can create multiple private networks, connect VMs to a host, bridge networks to a LAN and use Network Address Translation protocol (NAT) to connect those networks to a LAN.
The configurability of VMware Workstation's virtual networks makes Workstation powerful. But this same virtual networking flexibility can also make Workstation a challenge to configure. Although creating a new VM in Workstation is simple, configuring the virtual network poses issues. To ease such virtual network configuration burdens, you can give your VM guests Internet access.
Virtual Network Editor
One of the features that makes Workstation's virtual networking so configurable -- and complex -- is the Virtual Network Editor. This tool enables you to configure each of the different types of the Workstation networking options and work with the Dynamic Host Configuration Protocol (DHCP) and NAT Workstation services.
You can use the tool to create various lab scenarios and modify many network settings. Virtual Network Editor enables you to add and remove virtual networks and create custom virtual networking configurations as well as apply networking changes across an entire infrastructure. You can also use Virtual Network Editor to restore a network to its default settings in the event of an emergency.
Connect VMs to the Internet with bridging
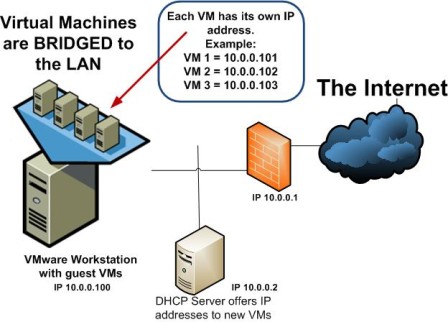
The task of connecting a guest VM to the Internet varies based on your network and Internet configuration. Assuming your LAN offers a DHCP server with default gateway and DNS, you have no MAC restrictions and your firewall allows any computer from the LAN to connect to the Internet, you shouldn't have to change any virtual machine settings to use bridged networking, or VMnet0.
If a VM host has one elastic IP address -- for example, 10.0.0.100 -- and each VM guest has its own IP address -- 10.0.0.101, 102, and 103, respectively -- that each receives from the DHCP server, then each VM guest acts as its own IP node on the network. This system makes each VM guest identifiable. You can connect to each using Remote Desktop Protocol, or connect to the Web interface using a VM guest.
However, if your physical network has IP restrictions, then you must separately configure each guest on the network. For example, if your firewall allows only specific devices to communicate with the Internet, each VM guest would require its own authorization on the firewall because it has its own IP address.
Windows networking restrictions can also present a challenge when determining how to connect to the Internet in VMware. Perhaps your Cisco switch device has MAC address restrictions. In this case, each of these VM guests has its own MAC address. The VM host's Ethernet port might lock down on the Cisco switch due to too many MAC addresses requesting network access. In this scenario, bringing up even one VM guest with bridging will get your host window or server disconnected from the network for violation of port security.
Bridging VMs to the LAN in order to connect to the Internet
To map a VM guest to a particular virtual network with bridging, configure the virtual network interface card (NIC) as bridged.
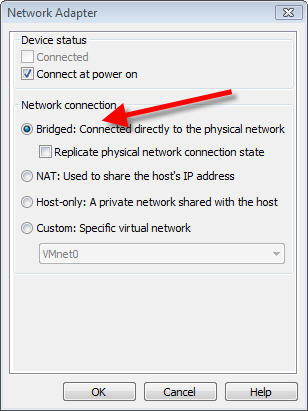
To connect a Workstation guest VM to the Internet via bridging, select the "Bridged" setting in the Virtual Network Editor
Connect VMs to the Internet with NAT
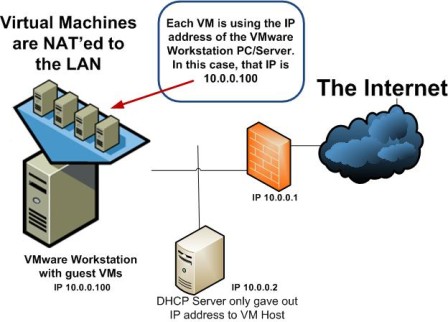
As an alternative to bridging, you can use NAT or VMnet8 to connect VMware to the Internet. With a NAT setup, all VM guests use the same host IP address. In other words, when the VM guest communicates with the LAN, the LAN actually sees the VM host making the request.
Connecting Workstation guest VMs to the Internet via NAT
Every VM needs its own IP address. In the case of NAT, VMware Workstation actually has its own internal DHCP server that hands out internal and private IP addresses to any VM guest on the NAT network.
If you navigate to the NAT tab in the VMware Workstation Virtual Network Editor, you can see the NAT Service. It must be running to translate the special Workstation NAT network -- 192.168.220.0 to 192.168.220.254 -- to the IP address of the VM host. VMs connected to the network via NAT default to the compute gateway 192.168.220.2.
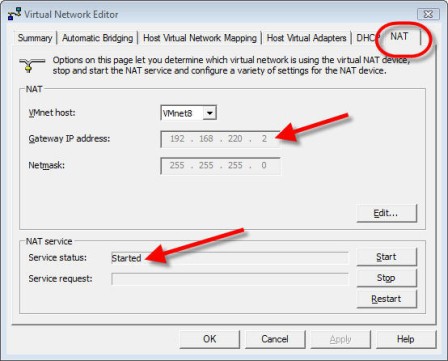
The default gateway for NATed guest VMs is 192.168.220.2, which you can find under the "NAT" tab in Virtual Network Editor
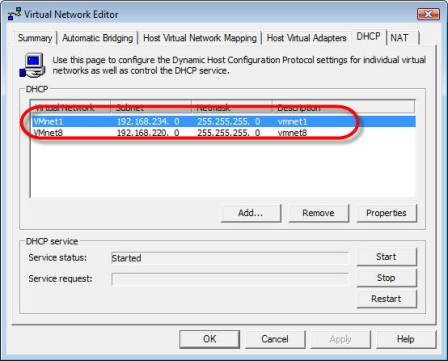
Still, the NAT service doesn't hand out IP addresses; the VMware Workstation DHCP Service does. If you look at the DHCP tab, you can see the DHCP range for VMnet8.
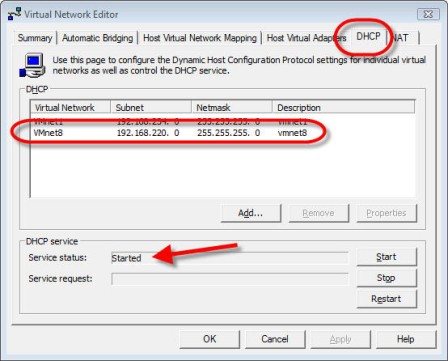
Under the DHCP tab in Virtual Network Editor, you can find the range for VMnet8
With NAT, each VM has its own IP address provided by the VMware Workstation DHCP service. Virtual Network Editor "NATs" that IP to the IP of the VM host in order to access the LAN and the Internet.
Test machines with IP address conflicts, malware or duplicate names
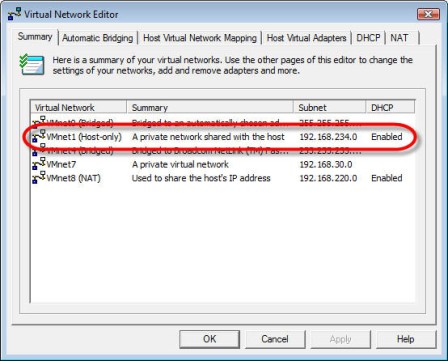
If you have VMs that have IP address conflicts, malware or DNS names that conflict with production server DNS names, you want these servers to run in a secure and private network to prevent possible risk to your production network. VMware Workstation has, by default, a private virtual network called VMnet7, which you can use in these cases.
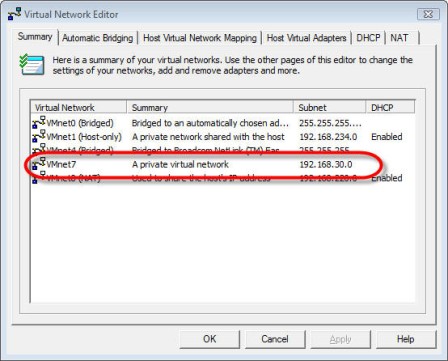
You can find VMware Workstation's default private virtual network, VMnet7, under the Summary tab in Virtual Network Editor
Keep in mind you must configure a static IP address on the VM guest in the private network since, by default, that subnet has no DHCP server. If you do want DHCP, you can configure Workstation to provide IP addresses with the Workstation DHCP service, or you could run a Windows DHCP server as a VM in the private subnet.
Test a safe VM that requires access to the host
If you have a VM guest that you don't want on the local LAN but you must share files and access that VM over a virtual network, you can use the host-only virtual network, VMnet1. While host-only networking isn't as secure as the private network option, the VM host and the VM guests on the host-only virtual network can communicate via TCP/IP networking.
VMware Workstation provides DHCP services to this private network using the default IP address range of 192.168.234.0 through 192.168.234.254.
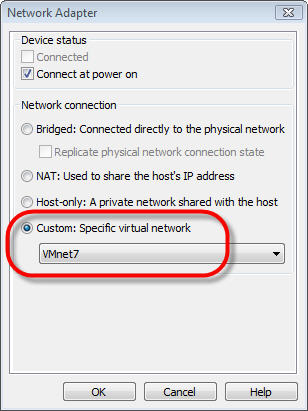
Workstation uses a default IP address range from its private network, VMnet7, to provide DHCP services -- which you can select in the Virtual Network Editor under the "Custom" network setting.
To configure a VM guest to use this private network, connect it to the Host-only virtual network.
Configure your guest VM to use a private network by connecting to the Host-only virtual network, VMnet1
VMnet1 is a host-only virtual network -- a private network shared only between hosts