TechTarget.com/searchvmware
https://www.techtarget.com/searchvmware/tip/Installing-VMware-vShield-Zones-for-a-virtual-firewall
Installing VMware vShield Zones for a virtual firewall
By Eric Siebert
VMware vShield is a suite of products designed to protect virtual infrastructure. Part one of this vShield series covered vShield Manager, Zones and App, part two discussed vShield Edge and Endpoint, and part three focused on installing VMware vShield Manager.
After you’ve gotten vShield Manager running, the next step is to install VMware vShield Zones, a basic virtual firewall, and upgrading to vShield App.
Installing VMware vShield Zones
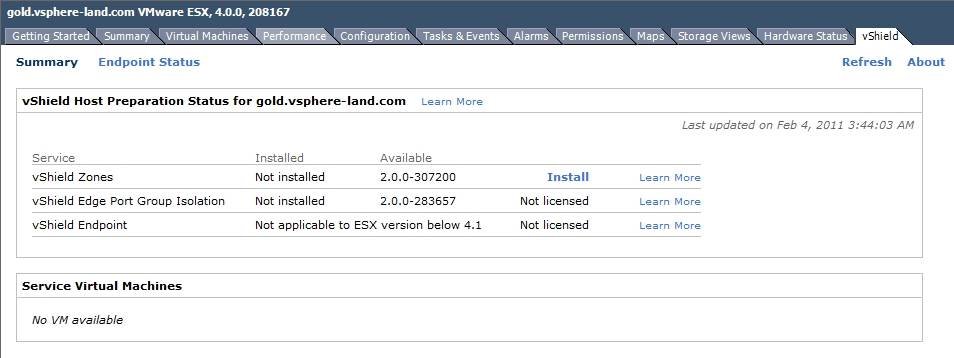
The first step in installing VMware vShield Zones is to select a host in vCenter Server and click the vShield tab. You will see options for installing vShield Zones, Edge and Endpoint. (Note that Edge and Endpoint are not licensed and cannot be installed.)
Figure 1
(Click image for an enlarged view.)
Click the Install button and enter the required information.
Figure 2
(Click image for an enlarged view.)
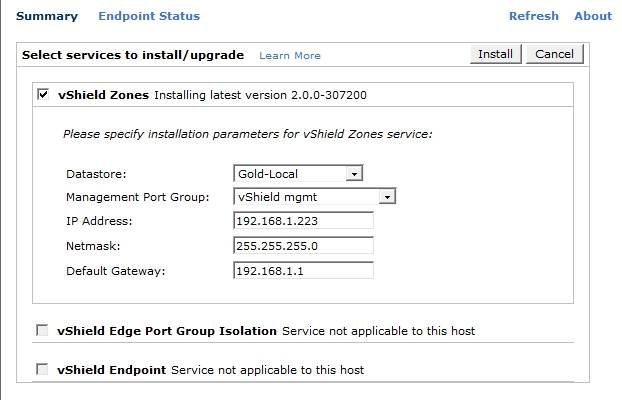
Next, choose a data store for the Zones agent virtual machine (VM). (A local data store is recommended so that an agent VM cannot migrate with vMotion.) Then choose a management port group, which should be the same port group on which the vShield Manager is located. You can use another port group, but it must be able to communicate with vShield Manager. Finally, enter the IP address information for the new VM and click the Install button.
As part of the installation, every VM on a host is reconfigured, but no changes are made to the VMs’ hardware setups. Instead, some configuration parameters are added directly to each guest’s VMX file on the host, as seen below:
- ethernet0.filter0.param1 = "uuid=503adeb0-4c8c-cb31-b8a7-2fba5791434b.000"
- ethernet0.filter0.name = "vshield-dvfilter-module"
These parameters are part of the filter that’s inserted in each VM’s virtual network interface card (vNIC), which allows vShield to monitor network traffic to and from a vNIC. The first parameter identifies the universally unique identifier of the vCenter Server. The second is the name of the loadable kernel module (LKM) on the host.
This arrangement is a new way of monitoring traffic with VMsafe application programming interfaces. The original version of vShield operated in bridged mode and sat inline between vSwitches so that all traffic to the protected zones passed through it. The new method of monitoring traffic at the vNIC, instead of the vSwitch, eliminates the vSwitch reconfiguration that previously occurred, and it provides better protection. In bridged mode, VMs in a protected zone had no protection from other VMs in the protected zone. But now that vShield Zones operates at the vNIC level, every VM is totally protected.
Migrating a vCenter Server VM
If you vMotion a vCenter Server VM from a protected to an unprotected host, it becomes temporarily unavailable during the migration. As a result, it can’t remove the filter, so it will lose network connectivity.
To restore network connectivity, manually remove the filter lines from the vCenter Server VM on the unprotected host. To avoid this situation, vCenter Server VMs should reside in a separate management cluster that does not have Zones installed.
With the filter inserted into each vNIC, VMs are protected by the vShield Zones virtual firewall, but you can’t exclude certain VMs. If you manually remove the lines that are added to a VM’s .vmx file (when the machine is powered off), vShield will reinsert them.
So if something happens to the Zones virtual firewall VM (e.g., it’s powered off), the networking on a host will go down, because nothing can route without the virtual firewall VM. If you migrate a VM from a Zones-protected host to an unprotected one, vCenter Server automatically removes the filter, so a VM won’t lose network connectivity on its new host.
Once you’ve installed vShield Zones on the first host, repeat the process for every host in the cluster. This process reconfigures VMs on each host and deploys the Zones virtual firewall VM to each host.
A new vSwitch, called vmservice-vswitch, is also created. It has no physical NICs assigned to it and has a VMkernel interface with a 169. IP address.
Figure 3
(Click image for an enlarged view.)
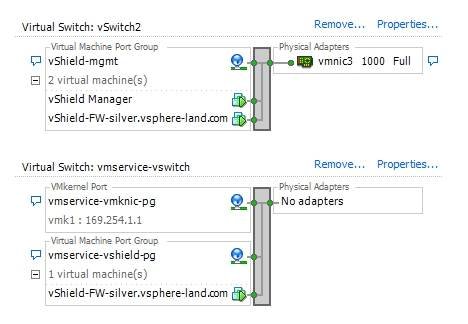
This vSwitch should not be modified. It’s used exclusively by the Zones firewall VM, which has two vNICs connected to it. Through the vNICs , the Zones VM communicates with the LKM in the VMkernel. One vNIC is used forcontrol, and the other is for data path communication.
VShield Zones configuration
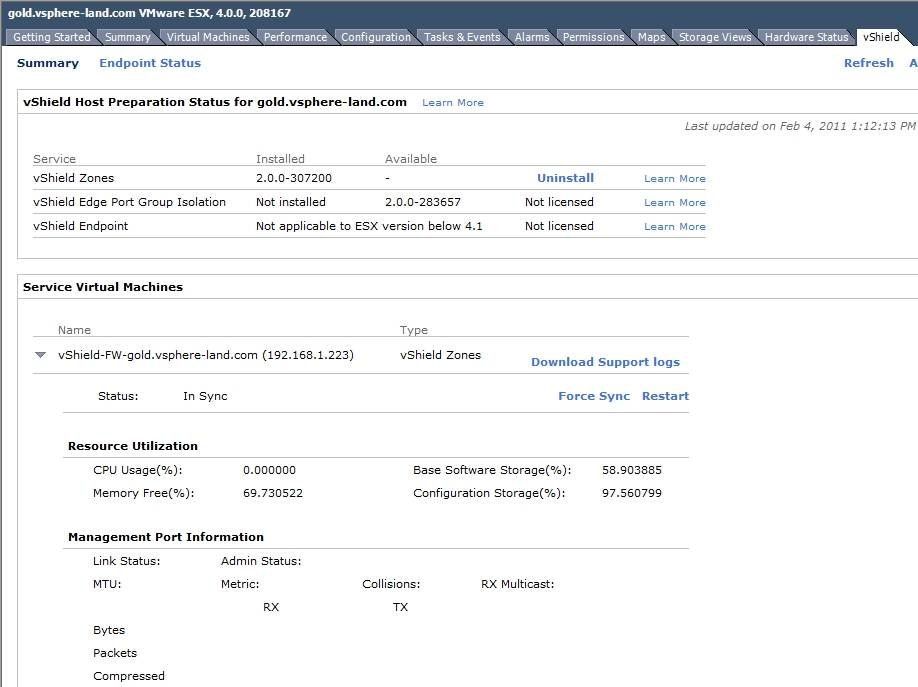
Now you’re ready to configure vShield Zones. The host’s vShield tab will show Zones installed, along with the version and service (agent) VM information on the host. You can also see the agent VM’s resource usage, including the CPU, memory and network statistics.
Figure 4
(Click image for an enlarged view.)
Once installed, vShield Zones is active, and the default rules are set to ANY/ANY and pass all traffic, which blocks nothing. You can set up rules by selecting the Datacenter, Cluster or Port Group objects, and clicking the vShield Zones tab. Rules have a hierarchy that begin with the Datacenter object and work down to port group rules. Before creating rules, read the vShield Administration Guide, which covers how to configure rules.
Upgrading to vShield App
VShield App is the enhanced version of vShield Zones, which has additional features. You don’t install App. Rather, you install Zones, then apply a license key to unlock App’s capabilities.
To upgrade to vShield App, either obtain or purchase an App evaluation key. Apply it on the standard vCenter Server licensing page by clicking Home, then Licensing.
Figure 5
(Click image for an enlarged view.)
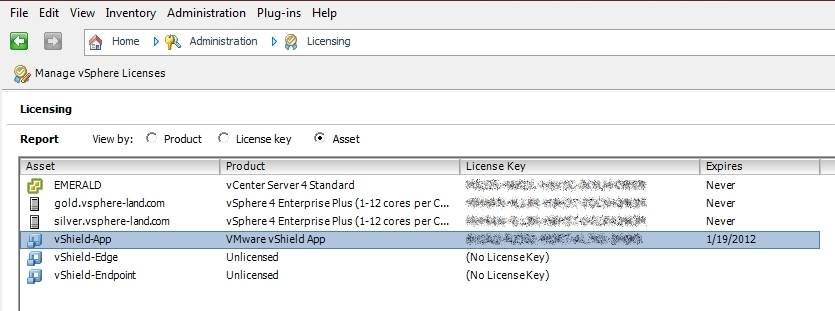
Under the Asset View, you will see the unlicensed instances of vShield App, Edge and Endpoint. To enter a license key, double-click on vShield App and choose Assign a new license key to this solution.
Multiple license keys can be entered, but only one can be assigned. If you have multiple keys for App, you can merge them on VMware’s website. Because App is licensed by the number of VMs, it will show how many VMs the license supports.
In the vShield tabs, new functionality will be unlocked, and the Zones virtual firewall link will now appear as App Firewall. A nice App feature is the ability to create security groups, which lets you assign vNICs and apply rules to the whole group.
Figure 6
(Click image for an enlarged view.)
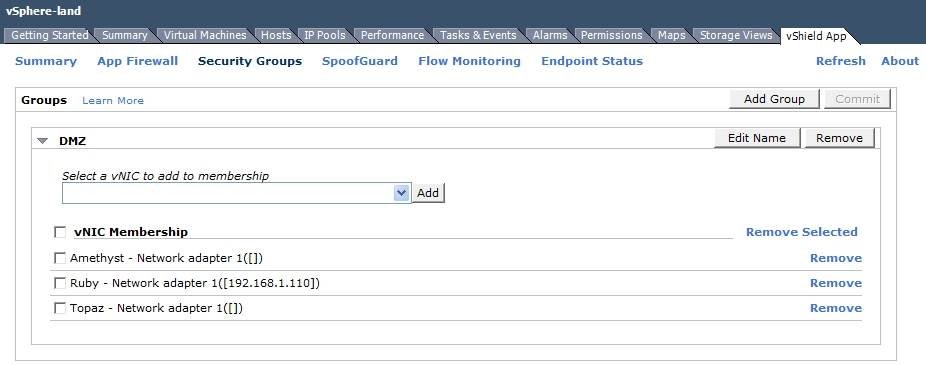
Because security is enforced at the individual vNIC level, security groups make rule creation easier. They also provide greater flexibility and better security compared with standard IP address-based rules, because their rules cover all traffic on the VM -- regardless of the IP address.
More on VMware vShield
- VMware pushes vShield, virtualization security vision
- VMware ‘vFabric’ revealed as vShield enhancements
08 Mar 2011